From cracked brick to stubborn concrete, here’s how to install outdoor step light like a pro—saving time, tools, and your sanity.
Installing step lights across concrete or brick isn’t just another checkbox on your contractor’s to-do list—it’s a full-blown precision mission. When you’re figuring out how to install outdoor step light systems across dozens (or hundreds) of fixtures, every drill hole counts. You mess up the placement on one stair? No big deal. Multiply that mistake by 50 steps and suddenly your client’s patio looks like it was lit by a blindfolded raccoon.
Brick crumbles if you use the wrong bit; concrete laughs at weak anchors—ask any seasoned installer who’s cracked a slab two hours before inspection day. Large-scale outdoor lighting isn’t just about wattage and weatherproofing—it’s about knowing your surfaces like the back of your calloused hand.
If you’re outfitting resorts, apartment complexes, or stadium stairs, this guide will save you time, tools—and probably some sanity too.

Key Points: How to Install Outdoor Step Light Fixtures
- Essential Tools: Gather drills, screwdrivers, and wire strippers for an efficient installation process.
- Space Preparation: Accurate marking and measuring are crucial for proper light placement on steps.
- Wiring Basics: Follow safe wiring practices to ensure secure connections and prevent electrical hazards.
- Final Adjustments: Test and adjust light angles for optimal functionality and aesthetic appeal.
- Concrete Methods: Use concrete-specific tools and techniques to secure lights effectively on solid surfaces.
- Brick Techniques: Employ proper drilling strategies on brick to avoid damage and ensure stability.
- Fastener Selection: Choose the right fasteners for each material to guarantee durable installations.
- Common Mistakes: Watch out for wiring errors, poor light placement, and improper sealing to avoid issues.
- Placement Tips: Ensure even distribution of lights for enhanced safety and visibility on stairs.
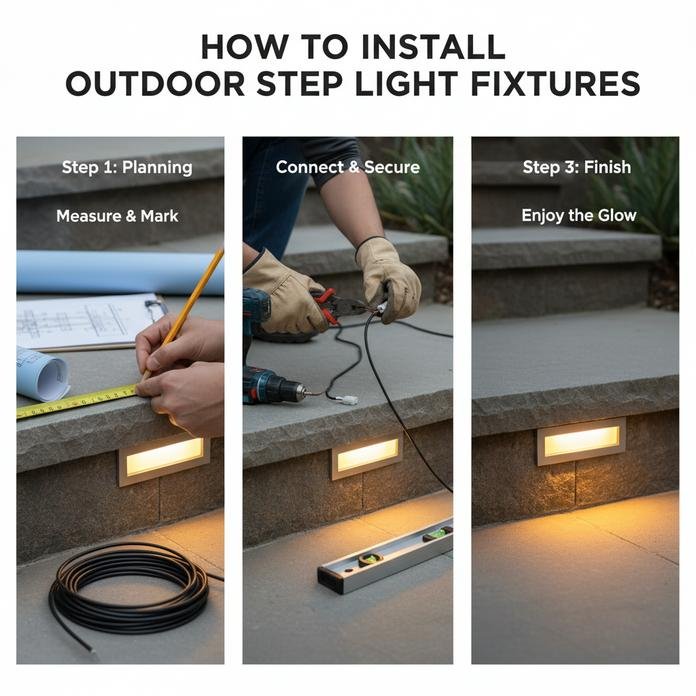
Step-by-Step: How to Install Outdoor Step Light Fixtures
Installing step lights outdoors doesn’t have to be a headache—just follow these practical tips and you’ll light up your stairs in no time.
Essential Tools Needed for Installation
Before even thinking about wiring, make sure your toolbox is stacked with the right gear:
- Drill with appropriate masonry bits, especially if you’re dealing with concrete or brick.
- A solid screwdriver, preferably one that can handle both Phillips and flathead screws.
- Sharp, reliable wire strippers to prep your cables cleanly.
- Protective gear like safety glasses, because flying debris is no joke.
- A good old-fashioned measuring tape—digital or manual, doesn’t matter—as long as it’s accurate.
- A small but trusty bubble level for keeping everything aligned.
- Optional but helpful extras include a pencil for marking, electrical tape, and a voltage tester.
Don’t skimp here—having the right tools means fewer mid-job hardware store runs.
Preparing Your Space: Marking and Measuring
Getting those lights lined up just right? That’s where patience pays off.
Start by scoping out where each light should go. Use a pencil or chalk line to lightly mark positions on each stair riser. If you’re working on a rough surface like brick or stone, measure twice—irregular textures can throw off your spacing fast.
Next, use your measuring tape to confirm equal distances between each unit. For multi-step areas, break the space into zones so you don’t get overwhelmed trying to eyeball everything at once. Don’t forget to account for how wires will run behind or beneath the stairs—especially if there’s concrete involved.
Finally, grab your level and double-check horizontal alignment across steps; uneven placement won’t just look bad—it could mess with light distribution too.
Wiring Your Outdoor Step Lights: Simple Guidelines
Now comes the part that feels intimidating—but it doesn’t have to be if you’ve got a plan.
• Start by connecting all fixtures using low-voltage wiring; this keeps things safe around wet surfaces.
• Use waterproof connectors and run wires through protective conduit whenever possible—it shields them from wear over time.
• Make sure all wire connections are tight using proper-sized wire nuts; loose ones are asking for trouble down the road.
Once fixtures are connected in series or parallel depending on layout needs, link them back to a transformer suited for outdoor use. Most importantly? Always shut off power before touching anything live—even low voltage can sting if mishandled.
A quick tip: Label both ends of every cable during setup—that tiny bit of extra effort now saves massive confusion later when troubleshooting or expanding.
Final Touches: Testing and Adjusting the Lights
With everything wired up, it’s time to see what you’ve built come alive—and tidy up any rough edges while you’re at it:
- Flip on the power supply and test each fixture individually before calling it done.
- Check brightness levels; some LEDs allow minor adjustments via built-in settings or dimmer switches.
- Tweak angles so beams fall exactly where they should—not blinding people walking upstairs or casting weird shadows.
- Confirm alignment again using that trusty level—it’s easy for things to shift slightly during install.
- Give attention to aesthetics too; sometimes shifting just one fixture an inch makes all the difference visually.
And hey—if something looks off? Don’t hesitate to adjust it now rather than regret it later when night falls and flaws become obvious under full illumination.
By following these steps on how to install outdoor step light fixtures correctly—from prep work through final tweaks—you’ll end up with lighting that’s not only functional but also stylishly dialed-in.
Concrete vs. Brick: Choosing the Right Installation Method
Before you start figuring out how to install outdoor step light fixtures, know that the surface matters—a lot.
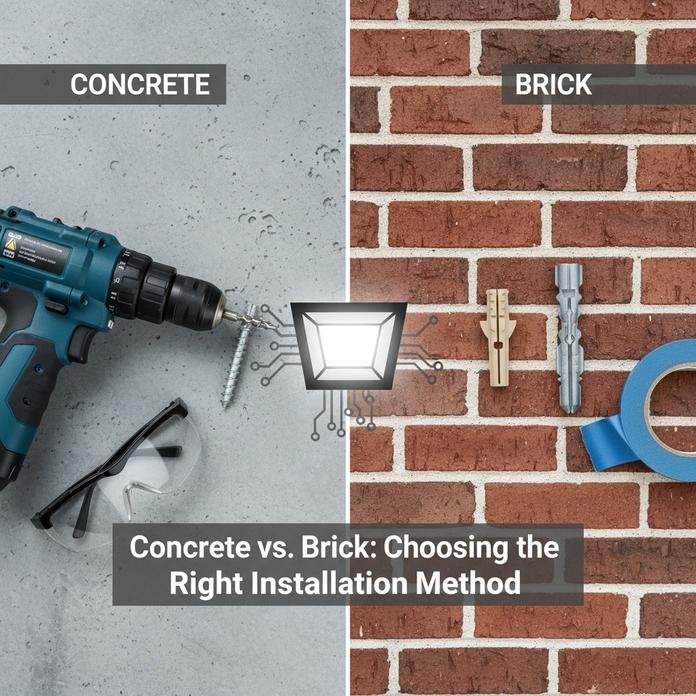
Tools for Concrete Installation
• A solid concrete surface needs a heavy-duty approach, so bring out a hammer drill, not your average cordless one.
• Pair it with a quality masonry bit, designed specifically for punching through dense aggregate without cracking or drifting.
• You’ll also need reliable fixings like concrete anchors, and don’t forget safety gear—think sturdy gloves, a snug pair of safety glasses, and a breathable dust mask.
• A good install starts with precision, so grab your trusty measuring tape, mark clean lines with chalk, and double-check everything with a long-handled level before drilling into anything permanent.
This tool lineup is your best friend when you’re mounting lights onto poured concrete steps or patios—especially if you’re learning how to install outdoor step light units that stay put through rain and foot traffic alike.
Recommended Techniques for Brick Surfaces
⮚ Drilling directly into brick? That’s risky business unless you know what you’re doing—aim for the softer, more forgiving mortar joints instead using the right size pilot hole.
⮚ Prep is key: brush off loose bits from the area and make sure it’s dry before you begin any kind of mounting work.
⮚ Use depth markers on your bit to control how far you go into the wall; overdrilling weakens stability and risks cracking bricks outright.
⮚ After drilling, clear out debris thoroughly—dust buildup can reduce grip strength by half when installing brackets or fasteners for lighting systems like MG Lighting’s outdoor kits.
⮚ When aligning multiple fixtures across brick walls or risers, use painter’s tape as guides—it’s surprisingly handy for keeping things straight while figuring out how to install outdoor step light units evenly across uneven surfaces.
Fasteners: Selecting the Best Options for Each Material
If you’re trying to figure out which fastener belongs where—this’ll help:
For Concrete:
- Go with rugged options like:
- Concrete screws
- Heavy-duty blue-coated options such as tapcon
- Load-bearing choices like high-grade stainless steel expansion bolts
For Brick:
- Your safest bets include:
- Versatile plastic wall plugs paired with standard screws
- Threaded inserts used alongside epoxy
- Anchoring solutions like zinc-coated or stainless steel versions of classic masonry anchors
Universal Choices:
Some items work across both surfaces if installed correctly:
- Industrial-strength adhesive-backed mounts combined with mechanical support
- Hybrid setups using both epoxy and physical anchors in tandem
- Lightweight LED systems supported by low-profile brackets secured via either lag shields or dual-use anchor kits
Choosing right here isn’t just about strength—it’s about longevity too. The wrong fastener might hold today but fail tomorrow when moisture sets in or temperatures shift wildly overnight. If you’ve been wondering how to install outdoor step light hardware that lasts through seasons? It starts here—with smart fastening decisions tailored to your material type.
How to Avoid Common Mistakes in Outdoor Step Light Installation
Get your outdoor lighting right the first time with these real-world tips and avoidable blunders.

Top 3 Errors That Can Ruin Your Installation
- Wiring faults often happen when folks rush through connections without checking voltage compatibility—double-check before flipping that switch.
- Poor placement leads to incorrect light placement, leaving dark spots or harsh glares that kill both vibe and visibility.
- Forgetting to seal fixtures properly? That invites water damage, which fries circuits and shortens light life faster than you’d expect.
MG Lighting recommends always dry-fitting before final installs to prevent brick damage or accidental concrete cracking during drilling. Also, never underestimate the risk of electrical shorts—they’re not just annoying; they’re dangerous.
Tips for Ensuring Proper Light Placement
Getting your lighting layout right isn’t just about looks—it’s about safety too. Here’s how to keep things on point:
• Keep consistent spacing between lights for balanced brightness—uneven gaps ruin both aesthetic appeal and function.
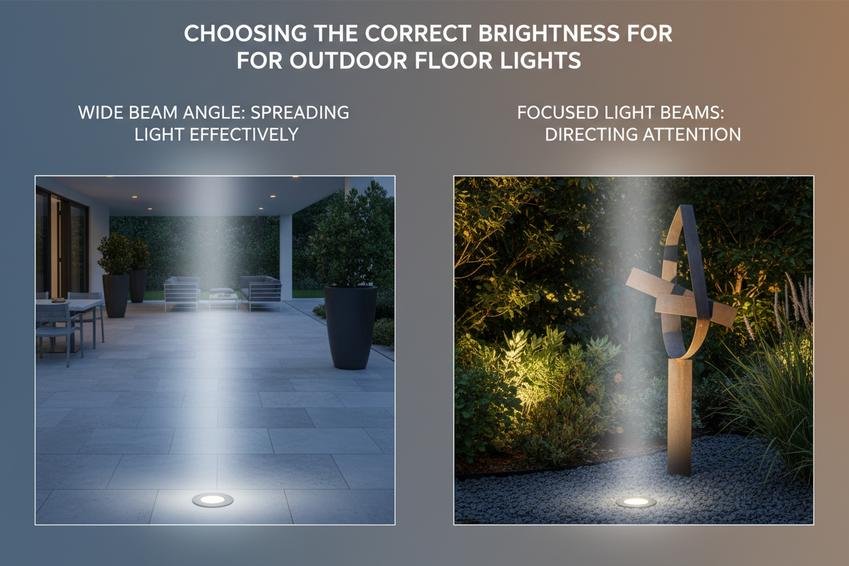
• Aim beam angles downward at the tread, not out into eyes—this reduces glare and boosts step visibility.
• Measure each mounting height precisely; even small errors throw off symmetry, reducing both style and safety.
| Light Position | Recommended Height (inches) | Ideal Spacing (inches) | Beam Angle (degrees) |
|---|---|---|---|
| Top step | 10–12 | 24–30 | 30–45 |
| Mid-stair | 8–10 | 20–24 | 35–40 |
| Bottom step | 10 | Consistent | 30 |
Double-check all placements against your blueprint before drilling—use painter’s tape as temporary guides if needed for better measurement accuracy and easier adjustments.
FAQs about How to Install Outdoor Step Light
How to install outdoor step light fixtures for larger projects?
Picture a row of dark steps transforming into a glowing path—
- Measure each position carefully; uneven gaps will haunt the final look.
- Drill openings suited to the surface, whether concrete or brick, paying attention to bit choice.
- Route cables neatly where no foot can trip on them.
- Secure fixtures with weather-ready screws and test all lights in unison for a dramatic reveal.
What tools help when mounting ground lights into solid concrete?
There’s a certain satisfaction in hearing masonry bits bite into stone—use:
- A hammer drill paired with heavy masonry bits for clean holes.
- Protective gloves so your grip stays firm even under vibration.
- Anchors made for harsh outdoor life, refusing rust’s slow ruin.
How do beginners avoid mistakes that plague step lighting installations?
Small missteps echo big consequences: wires pinched inside fittings spark trouble; lights too distant leave shadows unsafe; seals forgotten invite rain inside until corrosion wins.
Which fasteners work best when fixing lights onto brick steps?
Bricks have pride—they reject flimsy fasteners and welcome only:
| Fastener Type | Key Advantage | Use Scenario |
|---|---|---|
| Expansion Bolts | Strong grip in hollow spaces | Wide bricks outdoors |
| Corrosion-resistant Screws | Resist weather decay | Steps exposed year-round |
Can you blend concrete and brick surfaces within one lighting plan?
Yes—the craft lies in treating each material by its nature: expansion bolts nestle firmly into brick pores, while brute-force anchors hug dense concrete without cracking it.
Why is testing after installation an emotional moment as well as practical duty?
It’s not just checking circuits—it’s watching shadowed stairs bloom into safe passageways before anyone else sets foot there; it confirms every wire hums right and every beam hits its mark before the public arrives.