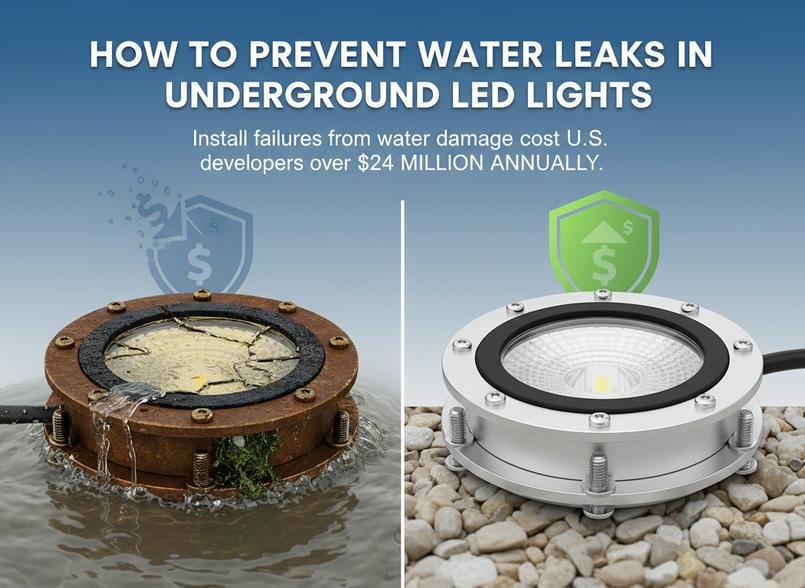
When moisture wrecks costly landscape and outdoor lighting installs, it’s more than rain—it’s profit leaking. Keep your ground lights alive!
In the world of landscape and outdoor lighting, nothing kills a vibe faster than a soggy light fixture gasping for breath underground. Picture this: You’ve just signed off on a six-figure lighting install across a luxury resort, and three weeks in—bam! Half the path lights are flickering like haunted house decor. Water’s seeped in, warranties are void, and your client’s calling you at 2 AM with words we can’t print here.
“Moisture is enemy number one,” warns Jeff Carlson of IESNA (Illuminating Engineering Society), “especially when contractors cut corners on sealing or skip proper drainage prep.” Install failures from water damage cost U.S. developers over $24 million annually, according to data from Smart Outdoor Lighting Reports 2023. So yeah—it ain’t just rainwater; it’s real money leaking into the ground.
Understanding Water Leakage in Underground LED Lights
Water and electricity don’t mix, especially when it comes to buried lights. Here’s how moisture messes things up—and how smart design keeps the glow going.
Common causes of water leaks in underground lighting
- Improper installation techniques – Skipping sealing steps or using the wrong materials often leads to early failure.
- Cracked housings from impact or wear – Over time, even tough fixtures can break under pressure.
- Worn-out seals or gaskets – Aged rubber loses elasticity, making room for sneaky leaks.
- Poorly sealed cable entry points – Loose fittings around wires are a common entryway for water.
- Ground movement over seasons – Shifting soil stresses the fixture body and may crack it open.
- Condensation buildup inside enclosures – Big temp changes cause internal fogging if ventilation is lacking.
- Manufacturing defects – Even premium brands can slip up once; always inspect before burying anything permanent.
Underground light fixtures take a beating below the surface—these issues are why waterproofing matters so much.
The impact of moisture on LED performance and lifespan
When water gets into an LED fixture, here’s what goes downhill fast:
• Brightness drops as internal components corrode—moisture encourages metal decay, leading to poor conductivity.
* You’ll see flickering or full-on blackout if a short circuit hits the driver board inside the lamp body.
* Colors might shift weirdly as phosphors degrade under wet conditions—especially with cheaper chips lacking protection layers.
According to a 2024 report by Lighting Research Center, “Even minor humidity intrusion can reduce an outdoor LED’s operational life by over 60%, especially where IP ratings fall below IP66.”
So yeah… even a little bit of dampness is bad news for your backyard vibe.
Key features in LED lights that prevent water ingress
Grouping together some must-have protections:
🔹 High IP ratings like IP67, which means dust-tight and submersible up to 1 meter for 30 minutes.
🔹 Fully sealed enclosures using resin-based potting compound, locking out every drop—even vapor.
🔹 Durable gaskets and flexible O-rings, usually made from silicone or neoprene for long-term elasticity.
🔹 Secure cable management with threaded fittings called cable glands, keeping connections tight against pressure changes.
🔹 Tough outer shells made from stainless steel or aluminum offer corrosion resistance—a big plus underground where soil acidity varies wildly.
🔹 Rugged waterproof connectors rated for direct burial help avoid weak links at junctions between light units and power lines.
If you’re picking gear for any kind of outdoor lighting setup—from garden path LEDs to driveway uplights—these features are non-negotiable if you want them lasting more than one rainy season.
Importance of proper drainage in landscape lighting setups
• Water pooling around fixtures? That’s just asking for trouble—and rust, shorts, and moldy wiring sleeves will follow soon after.
• Adding French drains near low points helps redirect runoff away from buried lights effectively without needing pumps or heavy grading work.
• Use gravel beds beneath each fixture base; they let groundwater pass through instead of sitting stagnant around your wiring box.
• Sloping surfaces slightly during install ensures natural flow paths form—no puddles left behind after storms roll through your yard!
• Tiny details like adding weep holes inside housing bases allow trapped condensation to escape gradually without harming internals over time.
Good drainage isn’t just about dry feet—it’s crucial if you’re investing real money into professional-grade outdoor lighting systems designed for years of reliable use across all four seasons.
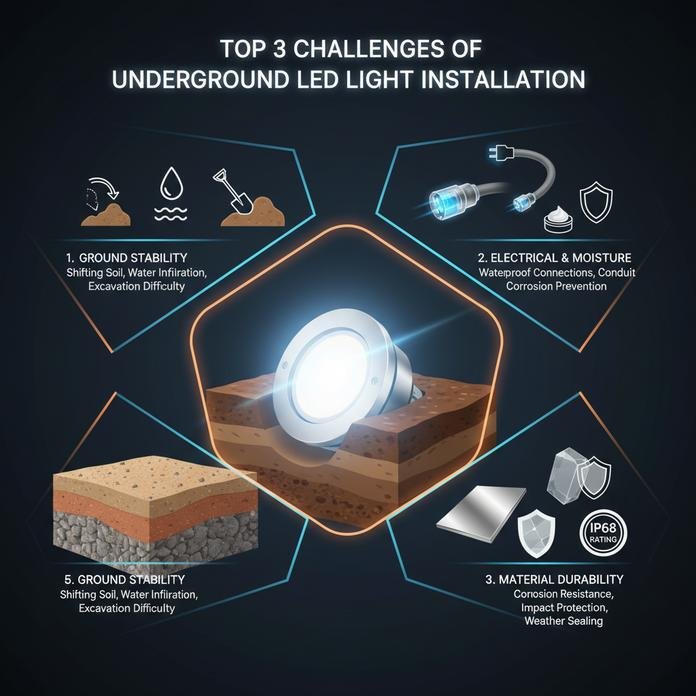
Top 3 Challenges of Underground LED Light Installation
Underground lighting can be tricky. Let’s break down the three biggest headaches that often pop up during install.

Navigating different soil types: Implications for installation
Different soils throw different punches. Here’s how each type can mess with your underground setup:
- Sandy soils drain fast but don’t hold fixtures steady—expect shifting.
- Clay-heavy ground retains water, which can cause swelling and pressure on light housings.
- Rocky or compacted terrain? Tough digging and poor drainage, unless you prep it right.
To keep things secure: * Use geotextile fabric under fixtures in loose soil.
* Add gravel-rich backfill for better support and moisture control.
* Pack soil around lights firmly to improve compaction, reducing tilt over time.
Ignoring soil quirks leads to flickering, buried lights, or worse—full-on collapse after a storm.
Ensuring proper electrical connections: Avoiding moisture-related hazards
Moisture is the silent killer of outdoor wiring jobs—especially when you’re burying cables in dirt. Here’s what keeps things dry:
- Always go for high-quality waterproof connectors with a solid IP68 or higher rating.
- Encase wires inside rigid PVC conduit to prevent crushing from shifting earth.
- Apply dielectric grease at every joint—it blocks water ingress like a charm.
- Don’t skip on sealed junction boxes, especially near sprinkler zones or low points where puddles form.
If you’re using 24V DC systems, make sure the transformer is also weather-rated and properly grounded using certified grounding rods.
One little leak can short your entire line—and fixing it means digging everything back up again.
Choosing the right materials for long-term reliability
Not all fixtures are built to last underground—some corrode within months if you cheap out on materials. Here’s what actually holds up:
Grouped by need:
Durability & Weather Resistance:
- Fixtures made from marine-grade stainless steel or anodized aluminum offer top-tier corrosion resistance
- Look for lenses made from impact-tested polycarbonate
Sealing & Protection:
- Tight-fitting gaskets and industrial-grade silicone-based sealants
- High-level ingress protection (IP) ratings (IP67+ minimum)
UV & Environmental Stability:
- Materials with proven outdoor UV stability don’t yellow or crack
- Avoid plastic blends without ratings—they degrade fast under sun exposure
Mg Lights makes this easy by offering pre-certified gear designed specifically for complex terrain and extreme weather—all while keeping aesthetics sharp across your entire landscape and outdoor lighting system.
Choosing wisely now saves hours of maintenance later…and keeps everything glowing just like day one.
How to Seal Underground LED Lights Effectively
Keep your underground LED setup dry and long-lasting with these smart sealing moves.
Recommended sealing methods for above-ground connections
Above-ground wiring in any landscape and outdoor lighting setup needs serious protection from rain, dust, and curious critters. Here’s how pros keep it tight:
- Use junction boxes rated for outdoor use—these act as your first line of defense.
- Wrap exposed wire points with high-quality heat shrink tubing, then add a layer of UV-resistant insulation.
- Apply a generous bead of silicone sealant at entry/exit points on enclosures.
- Run wires through protective conduit, especially where they might be stepped on or hit by tools.
- Reinforce weak spots using layered waterproof tape, especially around bends or splices.
- Tighten down cables securely with threaded cable glands, ensuring no moisture sneaks in.
- For extra durability, pour a small amount of insulating potting compound into junctions to lock out humidity completely.
These steps don’t just keep water out—they also help avoid corrosion and electrical shorts in your garden lighting systems.
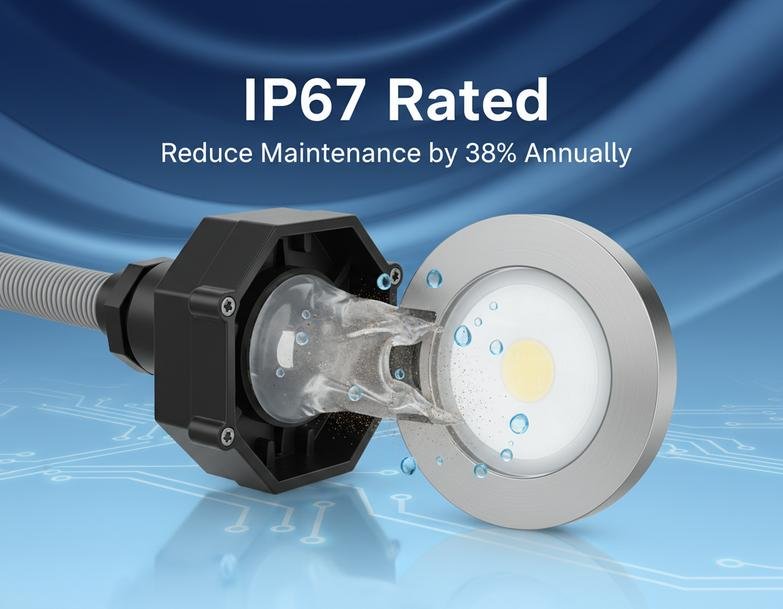
Utilizing IP67 waterproof ratings for maximum protection
The magic number here is 67—and no, it’s not someone’s lucky lotto pick. It’s the gold standard when it comes to protecting gear like LED lights used in your outdoor pathways or accent zones.
✓ An IP67-rated fixture is both completely sealed against dust (dustproof) and can handle being dunked underwater up to 1 meter deep (submersible)—perfect for areas prone to puddles.
✓ Always check product packaging or datasheets for the official “IP” label—don’t just take the box art at face value.
✓ Combine this rating with proper installation techniques like raised conduit paths and sealed joints to get full-spectrum protection.
According to a 2024 report by Outdoor Lighting Global Insights, “IP-rated products reduce maintenance calls by up to 38% annually in residential installs.” That’s less hassle, more glow.
How to apply sealants for optimal waterproofing
Sealing isn’t about slapping goop on things—it’s about methodical application that holds up over time.
- Clean all surfaces thoroughly before applying any product; dirt kills adhesion.
- Choose the right compound—go with flexible options like silicone, unless you’re working near heat sources where you might need tougher stuff like polyurethane.
- Load your application gun evenly and squeeze slowly around cable entries, screw holes, or seams.
- Smooth out excess material using a plastic spreader or gloved finger so there are no air pockets left behind.
- Let it cure fully based on manufacturer instructions—rushing this step means wasted effort later when leaks show up.
When done right, this process locks out moisture even during heavy storms that soak your outdoor lighting zones overnight.
Selecting the right power supply connectors for secure sealing
Your LEDs are only as good as their weakest connector—and trust us, skimping here causes most failures in modern yard setups.
• Go with fully enclosed waterproof connectors, preferably twist-lock types that snap tight under pressure.
* Look out for models with built-in strain relief clamps; these prevent wear over time from wire movement during wind gusts or foot traffic nearby.
* Choose units labeled as having an appropriate “IP” rating (IP-rated)—aim high if you’re installing near sprinklers or low points where water pools often.
* Use solid-core wires inside terminals like screw-down blocks (screw terminals) instead of loose crimps unless you’re confident in weather-sealed crimp caps (crimp connectors).
* Route all power lines through protected entries such as grommeted holes (cable entry) backed by rubber seals that compress when tightened down.
Trust brands that specialize specifically in rugged outdoor applications—like Mg Lights—for reliable gear that won’t flake out mid-season.
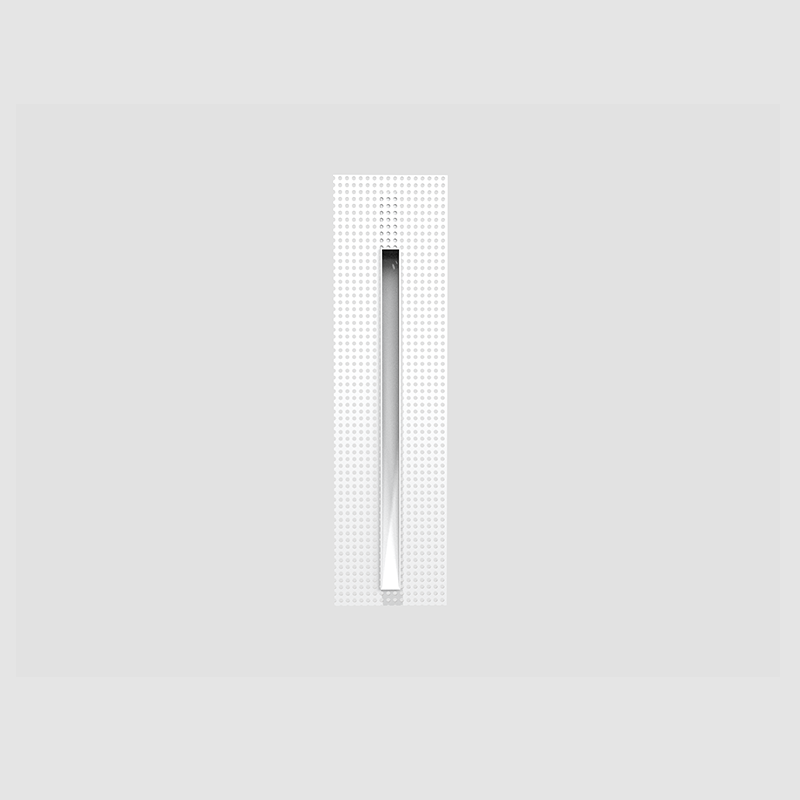
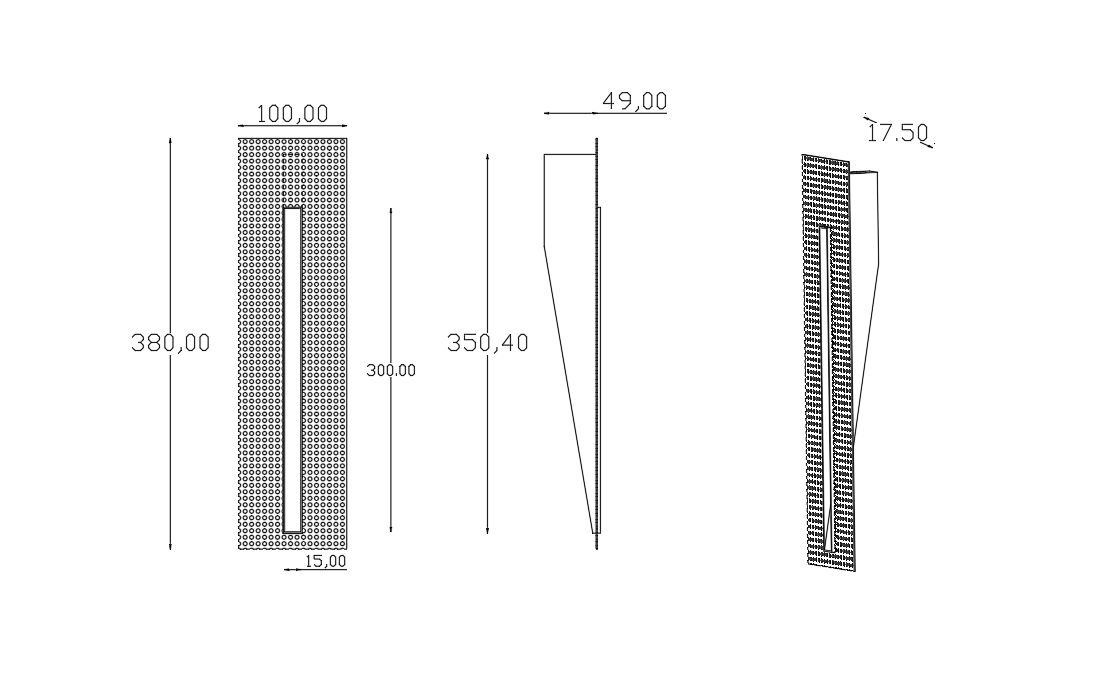
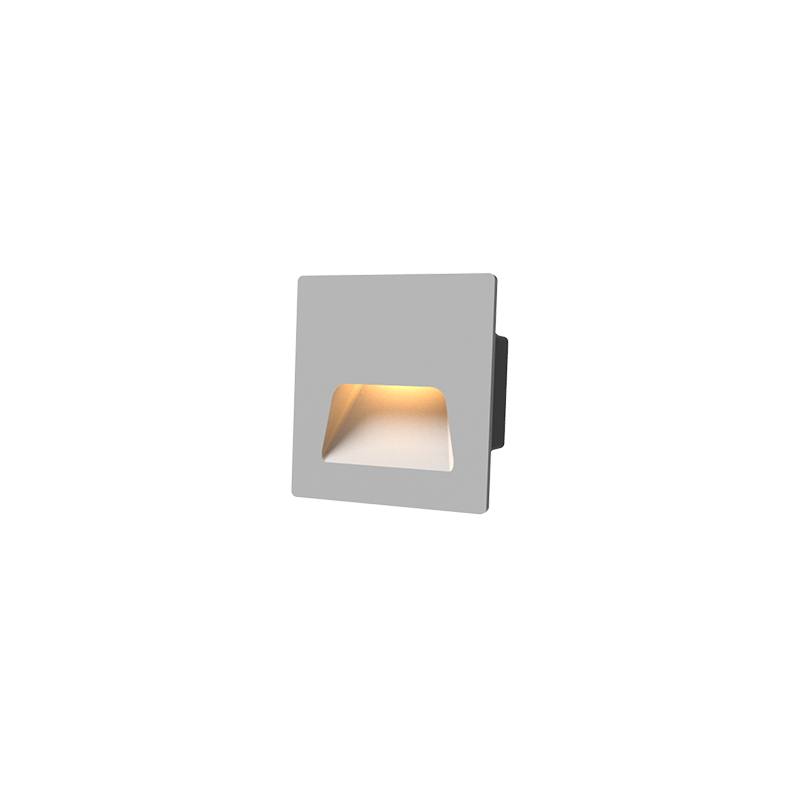
Installation techniques: The importance of flush-mounted ground lights
Sometimes it’s not just what you install—but how deep you go doing it—that keeps things working long term outdoors.
Flush-mounting light fixtures directly into walkways or patios helps prevent puddling around lenses after rainstorms—a major win if you’re illuminating garden beds or stone paths frequently walked on by guests.
Start by excavating a precise cavity that’s slightly deeper than the fixture body itself; fill half with compacted gravel before running your wire path via underground conduit routing toward the main transformer unit. After placing the light housing flat onto this base layer, backfill gently while checking alignment using a level tool across adjacent bricks or turf edges.
Finally, install any included rubber gaskets or silicone-based sealing rings between fixture rims and surface gaps—they’re small but mighty barriers against seepage into internal electronics during freeze-thaw cycles common in seasonal climates where outdoor lighting really shines year-round.
Common Mistakes Leading to Water Leakage
Even the best-looking outdoor lights won’t last if water gets in. Here’s where most folks mess up—and how to avoid those slip-ups.
Ignoring waterproof certifications in product selection
• Skipping over certification labels like IP67 or UL? Big mistake—these ratings aren’t just stickers; they’re your first line of defense against rain and moisture.
• Products lacking proper waterproof standards often fail faster, especially under harsh weather conditions common in many regions using outdoor lighting setups.
• Always check the manufacturer’s testing reports, and don’t trust vague claims—look for specifics around ingress protection and durability under wet conditions.
• A reputable brand should provide detailed product specifications, including the exact level of water resistance based on international benchmarks.
• For example, an IP65 rating might be fine for wall-mounted fixtures under eaves, but ground-level installations exposed to puddles need at least IP67 or higher.
• According to a 2024 report by Global Lighting Research Group, “Over 58% of premature failures in decorative garden lights were due to insufficient waterproofing measures at the selection stage.”
Poor installation practices that compromise sealing
Grouped pitfalls during setup that can let water sneak into your system:
— Misaligned components: If your fixture housing isn’t seated right, it leaves gaps that even a drizzle can exploit.
— Weak or missing gasket placement: Gaskets are crucial barriers; without them, moisture finds its way inside easily.
— Improperly sealed cable gland sealing areas: These entry points are notorious trouble spots when installers rush through wiring work.
— Over-tightened screws affecting housing integrity: Cracked enclosures from too much torque ruin the seal completely.
— Forgetting about gravity and ignoring proper drainage paths can turn a sleek patio light into a mini aquarium after heavy rain.
When dealing with any kind of landscape lighting, remember—it’s not just about connecting wires but building a watertight system from top to bottom.
Overlooking regular inspection and maintenance
Short reminders that pack a punch:
– Dirt buildup blocks vents and traps moisture inside your fixtures. Clean them out monthly if you live somewhere humid or rainy.
– Check every visible seal during seasonal yard cleanups. If any look brittle or warped, swap them out before leaks start.
– Test drainage around buried lights after storms; pooling water is bad news for even high-end systems with solid drainage system checks built-in.
– Keep tabs on electrical connections too—they corrode fast when exposed repeatedly without protection.
Routine upkeep helps extend the life of your entire landscape and outdoor lighting setup while keeping things safe and stylish year-round.
Maintenance Schedules: Keeping Underground Lights Safe from Water
Keeping your underground lighting dry isn’t just about slapping on a waterproof label—it’s about smart upkeep. Let’s break down how often and what exactly needs doing.

Recommended intervals for inspecting outdoor lighting systems
- Bi-annual inspection is the sweet spot for most setups—spring and fall are prime times.
- Seasonal checks after heavy rains or snowmelt catch damage early.
- A quick quarterly assessment can help spot early signs of corrosion or lens fogging before they mess with performance.
“Regular inspections reduce failure rates by up to 37%,” according to a 2024 report from the International Outdoor Lighting Association (IOLA). That’s not pocket change when you’re running extensive landscape and outdoor lighting across large yards, driveways, or commercial zones.
So yeah, don’t skip those checkups—they’re your best bet at keeping the whole system tight against water creep.
Essential maintenance tasks to prevent moisture damage
🛠️ Here’s what keeps your underground lights from drowning:
- Check seal integrity—any loose rubber ring or hardened gasket is a red flag.
- Swap out old gaskets with fresh ones; gasket replacement is cheap insurance against leaks.
- Clear out drainage paths around each fixture—standing water ruins everything.
- Inspect wires for cracked insulation; exposed copper invites corrosion.
- Tighten up cable connectors and use quality cable glands rated for wet environments.
- For extra protection in humid zones, toss in some desiccant usage packets inside junction boxes.
Grouped Care Routine:
- 🔧 Physical Checks: housing cracks, lens clouding, rust spots
- 🌧️ Water Defense: test waterproof seals, unclog drains
- ⚡ Electrical Safety: examine wiring insulation, reseal connections
Maintenance isn’t glamorous—but neither is rewiring half your yard because you ignored it. Keep that landscape and outdoor lighting glowing right by staying ahead of water damage before it becomes a wallet-drainer.
| Task Type | Frequency | Risk If Ignored | Tools Needed |
|---|---|---|---|
| Seal Inspection | Every 6 months | Moisture ingress | Flashlight, gloves |
| Drainage Check | Quarterly | Fixture flooding | Small shovel |
| Gasket Replacement | Annually | Corrosion buildup | Screwdriver set |
| Wiring Inspection | Bi-annually | Short circuits | Multimeter |
Proper care doesn’t just protect your fixtures—it protects your investment in quality outdoor lighting design that actually lasts through all seasons.
FAQs about Landscape and Outdoor Lighting
What causes water ingress in underground LED lights?
It often begins with tiny breaches you can’t see — a seal left imperfect during installation, or a hairline crack in corrosion-resistant aluminum alloy. In garden ground lighting or recessed ground luminaires for architectural accent lighting:
- Insufficient IP67 waterproof rating opens the path to moisture.
- Pooling rainwater around flush-mounted units invites slow seepage inside durable polycarbonate lenses.
The story usually ends with dimming integrated LED light sources far sooner than intended.
How does drainage affect the lifespan of outdoor fixtures?
In clay-rich soil, every storm turns into an endurance test for spike-mounted landscape lights used along residential pathway lighting projects:
- Poor drainage keeps heavy-duty cast iron bases submerged longer than safe.
- Prolonged contact corrodes weatherproof stainless steel housings despite their strength under normal conditions.
- Once pooling sets in, even energy-efficient halogen lamps suffer early failures due to trapped humidity within lens chambers.
Which materials signal real durability in commercial installations?
Commercial landscape lighting lives through seasons without pity — so choosing wisely is survival:
◆ Weatherproof stainless steel housing resists salt spray at public park illumination sites.
◆ UV-protected composite material shields integrated LED light sources from fading under intense summer sunlight on promenades and plazas.
◆ Heavy-duty cast iron base stands firm beneath surface-mounted ground spotlights used where crowds gather nightly.
How do proper electrical connections extend system life?
Poor wiring silently shortens years off high-power LED modules installed outdoors:
- Waterproof power connectors stop creeping moisture before it reaches 24V DC power supplies hidden deep inside remote power distribution boxes.
- UL safety certifications paired with CE compliance standards give confidence that each connection will survive storms and irrigation systems without sudden outages across wide lawns or intricate garden layouts.
Why pick flush-mounted designs for busy pathways?
Flush-mounted ground lights merge into pavement like quiet guardians along lit walkways:
- No raised edges mean feet glide past undisturbed during evening strolls under dimmable LED light bulbs controlled by automatic dusk-to-dawn sensors.
- Rain flows away instead of forming puddles over polycarbonate lenses, protecting both fixture aesthetics and foot traffic safety just as much as function itself.